
Easy DIY Reusable Tote Bag With One Yard or Less


If I told you that a DIY reusable tote bag in two hours or less was possible, you’d say, “Mary, that’s a fairy tale!” To which, I would reply, “Au contraire mon frère! It is no child’s tale, it’s real!”
This is a ridiculously easy project continuing with my challenge to use up your stash scraps and find creative ways to DIY with one yard or less. Reversible, practical, reusable, and downright adorable, you can’t have too many tote bags, can you?
You’ve got your stash, and you’ve got your stuff. But you’ve got no place to stash your stuff. You’d go to the gym, but what to with your workout clothes?
Solution! Let’s take that stash and make a reusable tote bag!
Difficulty: Easy – some sewing experience required
Materials:
 1 yard total – 1/2 yard each coordinating upholstery, canvas, or other medium weight fabric
tote bag for a pattern if you have one
Note: if you don’t have a tote bag, which is probably why you want to make one…figure a size that works for you and how wide you want it to be. Just that simple
Optional: You can add a zipper. Comment below for instructions
Recommending Needle and Thread: Size 18 heavy duty or triangle point needle, All-Purpose thread, or my personal favorite, invisible thread
Instructions
Bag Body

 Fold fabric in half, right sides togetherStart by flattening your bag or transferring your measurements per the note above on to your fabric.
Trace around leaving 5/8 inch seam allowance.
Cut out four pieces, two of each color for the outside and the reversible lining.
Bag Side
Measure around three sides of your bag. Mine was 48″. Measure or decide how wide your bag needs to be. Transfer that measurement to your fabric and cut one piece each for the outside and the lining. Add a couple of inches to allow for making a mistake. Don’t worry, we’ll trim it later.
Bag Straps

To make the straps, copy or decide on a length and width for your straps. Cut two straps (or one long strap that you will cut in half later). Fabric is your choice!)
Pocket is optional. If you choose to add pocket, decide on a size that works for you. This project calls for a pocket on the inside. But that’s up to you. If you want side pockets, again, comment below and I’ll share instructions with you.
Let’s sew this bad boy!
Straps
First thing I prefer to do is make the straps and the pocket. They are details, so I don’t want to stop in the middle to make them.
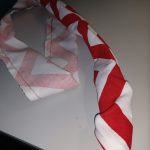 To make the straps, simply fold in half, right sides together. Start at one end, closing it and continuing around leaving the other end open for turning. (Optional: Stitch across at the middle point Cut in half at the middle point leaving about 1/4″ seam allowance. ) Turn right side out and press with the seam to the outside edge.
Set aside
Pocket(s)

To make pockets, pin right sides together and stitch leaving a small section open for turning. Trim and clip corners
Turn right side out and press, turning under the hem you left open.
Pin and place to right side of the lining or the outside. Topstitch around the pocket on three sides. Reinforce the corners if necessary by sewing across the corners to form a triangle.
Set aside
Main Body

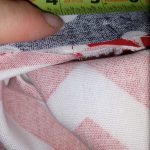
 Lay your side piece and one body piece with right sides together. Using a 5/8″ seam allowance, sew around the sides and bottom, making sure to stop at the corner, clip it and do a pivot turn.
To do a pivot turn, stop with 5/8″ to go at the corner, bury the needle, lift your presser foot and turn the work to make the corner. Continue until the next corner and repeat. DO NOT SEW ACROSS THE TOP!
Repeat for the other side being careful to sew the corners exactly the same. If you go too far in or out from the seam allowance, your sides will not come out correctly. You’ll know this happened if you end up short or long at the end.
So don’t do that!
Turn and press paying special attention to the seams to keep them flat.
Gettin’ Fancy
We’re going to create a little style by making a flange on the side. This is so simple, you’ll be amazed!

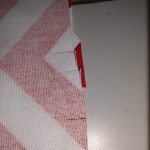
 Pinch the seams out flat, WRONG SIDES IN. Starting at 5/8″ below the top, sew a narrow topstitch along the edge. Be careful at the corners to not catch the bottom or side in your stitch. Repeat for the other side.
Tip: To keep from catching the corners, pull the corners out and continually check and adjust when making the corner turn.
You have the option to flange or not flange the lining. You might like it flanged to make the reverse look the same as the other side.
Almost done!
Decide on strap placement and mark. Making sure to not twist the strap, wrap the strap across the bottom and pin in place to the RIGHT SIDE of the main body on the front and back.
Turn the lining wrong side out. Place the outside inside the lining with right sides together. Matching the side seams, pin across the top, sandwiching the strap edges between the front and the lining.
Sew around the top, reinforcing at the straps. Leave an opening for turning. I recommend between the straps on one side.


Turn right side out, push the lining inside and smooth to fit. Press along the top. Topstitch the top edge as with making the side flanges, again reinforcing at strap placement.
Press again.
Go stuff your stash! Impress your friends with your sustainable attitude as you show off your new DIY reusable tote bag.
Sew ‘n piece my friends!
For more sustainable projects, check out the archives. Also, visit us on Facebook, Pinterest and Instagram. As always, if you’re not signed up for our newsletter, please take a moment to do so. We love keeping in touch with you!

