
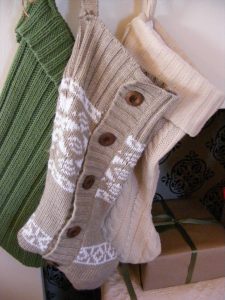
Make a Holiday Stocking With an Up-cycled Sweater
Difficulty Level: Easy
Materials Needed:
Sweater of your choice, large enough to fit desired stocking size
Optional – Low-temp hot glue if you choose no-sew
3 inch piece of coordinating ribbon for each stocking
Fray-stop clear nail polish (glue stick will also work)
Parchment or wax paper
I have a weakness for sweaters; like an Achilles Heel kind of weakness. I like anything sweaterish, and not just sweaters. I like blankets, hoodies, scarves, socks, mittens, pillows and yes, sweaters. Living in the Midwest, sweater weather is looked forward to after a hot summer. Even as Indian Summer prolongs the warm weather, we pull out our sweaters in anticipation of cooler days.
The problem with my weakness, is that it tends to make me buy without thinking. I quickly try on my choice in the store, admire it and bring it home only to discover when I pull it out to wear it a month later, I clearly did not have a brain that day. As I look in the mirror, I mutter aloud to myself and ask what in the whoseinfarkle was I thinking when I bought that!
As a result, I have a plethora of odd wonders that must be purged or pawned off. I figure my blunder will be someone else’s brag. At the same time, I hate to just give it away, so I’m always looking for an up-cycle. Christmas is over, but I like to start early, procrastinate often in the hopes I’ll finish by next Christmas. At the very least, I thought, what better way to adorn the house or send little bags of deliciousness in than these cozy stockings.
(For the record, you can use any kind of sweater, even ugly Christmas ones, Hannukkah sweaters that are trending now, mermaid sequin, just go crazy!)
The beauty of this project is it can be a no-sew/low-sew. If you can sew a straight line, you can do this. If you don’t want to, then by all means, glue to your heart’s content! Low temp hot glue is great for fabric projects because it holds super tight.
To begin, either trace around a stocking you have or freehand one. When tracing, add 1 inch for seam allowance all the way around.
Cut your pattern out and place where you want your design to be. I recommend using the ribbed bottom of your sweater if possible to form the top of your stocking. Place on top of the sweater and pin or weight in place. Carefully cut around. Apply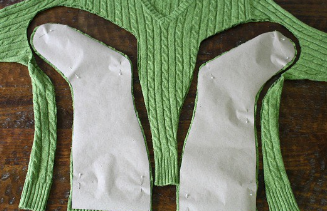 Fray-stop or clear nail polishto any edge that might come undone. Allow to dry completely before proceeding.
Place right sides together, matching all the edges carefully. Make a loop with your ribbon. Take the ends and sandwich just between the pieces near the top with the loop inside your stocking (when you turn this right side out, the loop will be on the outside.
**For stockings with cuffs:
To make a cuff, leave this part unglued or sewn if you don’t want the seam to show. After turning your stocking right side out, glue or sew the wrong sides together, again leaving the top open. When you turn the cuff down, the seam will be underneath where it won’t show.
Note: If your’re going to turn the cuff down, think carefully about loop placement so that it’s just at that corner where the cuff turns down.
Now. glue or sew (use a tight zig-zag stitch) 1/2 inch seam around leaving the top of the stocking opening. Turn right side out. Finish cuffs as above if desired and turn down.
Voila!  Now go have fun at the thrift store if you don’t have a sweater obsession like me.

