Part 2 Restoring a Victorian Fainting Couch – Tear Down Time

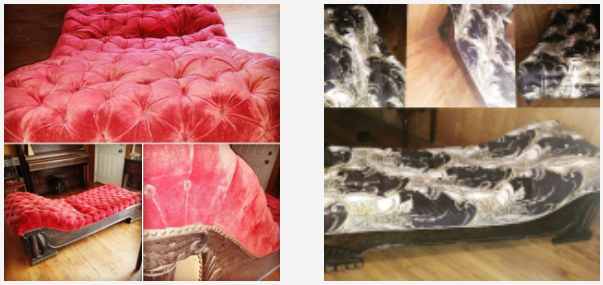
So you REALLY want to restore a fainting couch. Well welcome back! If you didn’t catch Part 1, read on. In Part 2, we’ll explore the rationale for my fabric choice, briefly explore the tear down process, and how I chose the fabric. Demo is the love-hate part for me, and you’ll soon discover why. Might be the same for you. Tell me some of your beastly tear downs in the comments. Love with no judgement here. On to the project, Her Majesty the fainting couch awaits!

Sew in Love With This Valentine Apron!

Valentine’s Day French Baker’s Apron Skill Level: Beginner (basic sewing skills required) Approximate Cost: Under $30 depending on fabric selection My family will concur that I am a messy cook, and a messy eater. When I sit down to enjoy a meal at the table, al fresco, dashboard diner, TV Takeout, or on the run, I know better than to go sans napkin. I’ve also been known to don a cooking apron or an old shirt replete with stains.  No shame. No apologies. Most times it’s just a tea towel. I even keep one on hand across the arm of…

Amazing Outdoor Cushion Makeover (Part 1 of 2)

Project: Outdoor Cushion Makeover Part 1 of 2 Difficulty Level: Moderate (Some basic sewing experience necessary) You’ve seen them on the curb. You’ve probably got a set in your garage covered in bugs, grime, the lawn furniture. They’re serving no purpose and you’d trash them were it not for the pile on top and the spiders underneath. I hear you. Toss them! Spend a couple hundred on a new set, right? Frankly, they’d be better used for the dog’s bed (of course, that’s not such a bad idea).  Don’t ditch those cushions! I know, DIY can be a lot of work.…

A Quick Introduction

Greetings and salutations! I wanted to take a moment to introduce myself. First, I’d like to say a big thank you to Tanya at Best Fabric Store for her EXTREME patience and grace with me. I’m privileged to have the opportunity to bring my creative know-how to you. She has waited with much grace and anticipation, and I couldn’t thank her enough for being the kind soul she is. And, provides hands down the finest customer service, ever! I’m a Texas girl who’s been a long term inmate… I mean resident of the state of Illinois. (I’m not an inmate,…

Double-eyeglass pouch

      Do you have multiple pairs of eyeglasses to tote around? Do you wish you could keep them in one handy case? Me too! Instead of two cases, I now have one with a little divider in the middle to keep them from rubbing against each other. You can adjust this pattern to suit your glasses.    

How to do a blind hem stitch

A blind hem stitch can be used for many applications, such as hemming garments or curtains. It’s useful when you don’t want to see a line of stitching on the outside of the finished product.  It seems tricky, but once you understand how the fabric is folded and the basic idea behind the stitch (tacking), you’ll have it down in no time. I was working on some curtains for an upcoming post and realized I hadn’t covered this before, so I thought it was time for a tutorial.

Knitting needle roll tutorial

If you knit, you have probably found that every time you decide on a pattern, you need a set of needles you don’t own. Before you know it, you’ve got quite a collection. I think I’d actually need several knitting needle rolls to hold all of mine. I designed this one with a pocket for notions like stitch markers and a counter. I love this owl fabric, which I paired with polka dots for a little contrast.

Food-a-plenty lunch bag tutorial

When I pack my lunch/dinner for work, I take a lot of containers, silverware and a big, reusable water bottle. So I need something that holds a lot. I wanted to make a cute, functional and ROOMY bag for my lunch.  I fell in absolute love when I saw this tea fabric. It’s cute, and I’m also into that natural, burlappy, linen-y look right now. I made a short strap, but you could always make it longer if you want to carry it on your shoulder. This bag uses Peltex as a stabilizer – it’s stiff and sometimes a bit…

How to insert an invisible zipper

Invisible zippers are beautiful on skirts and tops. They are a discreet closure for beautiful garments, and they are not hard to do. One difference you’ll notice from the way you insert a regular zipper is that you do not stitch the rest of the seam first. You first insert the zipper, then sew the rest of the seam. Frankly, I find it easier to get a nice, even finish with this type of zipper.