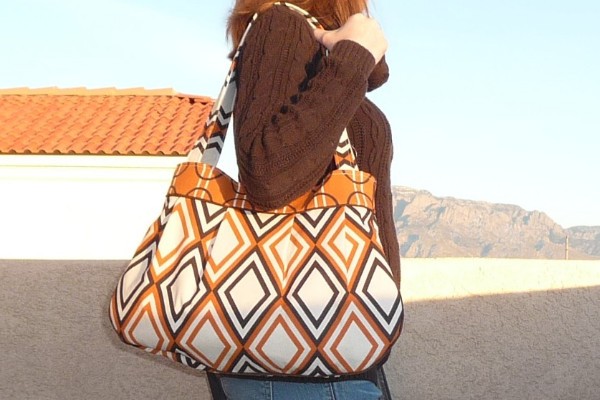
Making your own fabric bags means you’ll always have unique accessories. I have lots of them, and I get compliments all the time. They really stand out. This bag is pleated and nice and roomy as a purse. I have made this style in both a smaller and larger size, but neither ever seemed just right. This one I made somewhere in between. It holds all of my day-to-day purse stuff, with room to throw in a book or bottle of water, to boot. I took this out today and somebody complimented me on it and wanted one. See? That’s…
Magnetic snaps make great closures for handbags and totes. They’re clean-looking and offer quick and easy opening and closing of your bag. They’re easy to install, but if you don’t take a few precautions, you could end up with strained, torn fabric. Let me show you how I do it.
What’s worse than making a thin tube and then having to turn it right-side out? Uh … nothing. Here is a painless, turn-free way to make a nice, neat strap for a handbag or tote.
Ever have two pattern pieces that are supposed to be sewn together but are actually curved in opposite directions? You wonder how they are possibly supposed to fit together. Sometimes you’ll see this in shaped seams, like a princess seam on a woman’s top that must make room for the bust. Sometimes, in the case of this tutorial, it’s a flat seam (meaning, not convex) that is rounded for visual effect. It’s really not hard to do, and I’ll show you how.
You can make your own oven mitts and potholders for practically nothing. And why do we love sewing, people? Because we can choose our own fun fabrics, that’s why. We aren’t limited to the options at Target. We are limited only by our imaginations! Who knew handling hot pots could be so inspiring and exciting? Let’s go try it out.
For a long time, I hated doing buttonholes and I hated doing zippers. So I had a bit of a problem when it came to making closures on garments. The thing is, I’m not really ready to go for an all-Velcro wardrobe or elastic waistbands, but in 50 years? Who knows. When I first got my machine and began sewing, I was tackling a lot of new techniques all at once, and the buttonhole was a bit intimidating. I was actually pretty bad at them until recently. I am embarrassed to admit this, but after I broke my automatic buttonhole…
If you have an extra-wide ironing board like I do, you know it’s hard to find new covers for it. And when you do, they are usually just plain muslin. This could be the easiest sewing project you ever do, and it works for any size of ironing board. All you need is your old cover to use as a pattern. Best of all, you get to pick the fabric! I chose a ticking fabric that reminded me of the old days. Like the pillows my grandma would have had. This one is a light wheat color.
Last week, I did a post on a funky green jacket. This week, we’re going to look at the inside of the jacket. What you see from the inside is the lining. What you don’t see is the interlining, or the batting I added for extra warmth. The jacket pattern (McCalls 5060) included lining but not interlining, and so I wanted to discuss how to add that, and also what the difference is between interlining and lining. It’s very easy! This week, I also have a post on making your own covered buttons, related to this jacket.
I used to think covered buttons were too complicated. Silly me! It’s really quite easy, and sometimes they are just the thing to finish your project. This post refers to the green jacket I posted about last week. You can also find a post on jacket interlining and linings related to this project.
Sure, it’s easier to buy store-bought piping, but how often do you have trouble finding piping that matches just right? Plus, homemade piping made out of the fabric you’re using adds extra pizazz and looks professional. It takes a little more time, but it’s worth it.