
Tickety-Tocks This Table Runner Rocks!

![]() I love this project! I also admit I borrowed the idea! Thank you Driven By Design for the inspiration.
I love this project! I also admit I borrowed the idea! Thank you Driven By Design for the inspiration.
So ticking, most commonly known for its use in bedding material, has gained quite a bit of popularity and momentum in the design circles. ![]() Check out Hillary Duff sporting a ticking and lace pinafore for the Zimmerman show recently.
Check out Hillary Duff sporting a ticking and lace pinafore for the Zimmerman show recently.

Even Chip and Joanna at the Magnolia have several ticking home decor pieces. Yep, ticking has made its way out from under the covers and into the light of day!
So what are you waiting for? How about a totally today project like a ticking stripe table runner with a simple macrame edge?
Level of Difficulty Easy/Beginner Low-sew
Materials:
Ticking (see measurement instructions below)
Embroidery Floss (color your choice) about 15 yds or 2-3 skeins
Embroidery needle
Foam core or a sheet of cardboard
duck tape
Measuring for Ticking and Sewing the Runner
Standard size runners are 16-20″ wide. Ticking is 54″ wide and the pattern stripe is easy to match. Measure the length and width you want plus 2″ for seams. Cut to size.
Finish your edges by making a simple 1/2″ double fold on all four sides. With an iron, press in 1/4″, fold again along the first fold. Stitch close to the inside edge. Press. You don’t have to hem the ends, but it looks better.
Attach the cording
Take your floss and take the wrapper off. Untie any knots if there are any to keep it together.
Cut your floss into 4 foot long pieces. Thread onto a tapestry or embroidery needle.
Now do some math. Each section will have 4 pieces about 1/4″ apart, so measure your width and divide to figure out how many pieces. Or do like me and just eyeball it!
Thread the needle with the ends together. Thread the edge of the fabric with the ends hanging evenly. Measure or eyeball a 1/4 inch over and repeat. When you have four strand sections, skip over an inch and repeat. Do this across the edge of both sides of your runner.
Tying the Knot…well knots
Super easy. Don’t let macrame scare you. It’s just knot tying, and easy knots on that subject! Place a piece of foam core or cardboard under your work. Put a piece of duck tape across the edge but don’t cover up the cording and hold it in place while you tie.
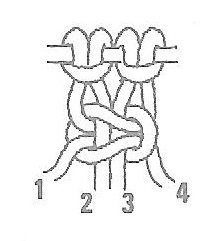
Now, while this diagram shows a single cord, you’ll have 4 cords in each strand.
Remember the square knot as a kid? Welcome back! Under over, over under. Repeat in the opposite direction. Snug your knot up just a little bit. We want a gap. Repeat this across the edge.

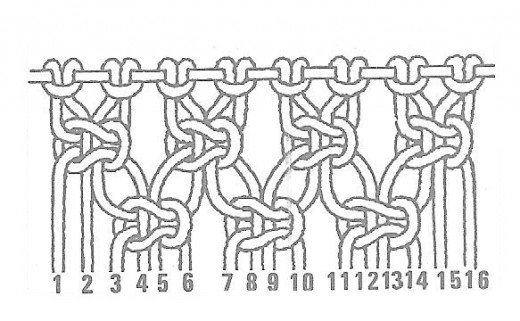
Now for the pretty part! We’re going to move this party over two rows. Make the same knot pattern all over again. That’s it. You’re done. If you want another row, knock yourself out! Trim the ends to make them even if necessary.
Enjoy!
Sew ‘n piece my friends!
BTW, I’d like to give credit to a customer project using ticking to make a simple table runner. Nice work Marion from Venice, FL!
![]()


